Note: this post assumes some prior basic knowledge of git, such as the definition of terms like commit and push.
A few months ago, Github finally announced native CI/CD, a key feature that was lacking compared with competitors such as GitLab. For the purposes of this post think of Continuous Delivery as a remote server that can execute commands to your git repository based upon arbitrary actions.
Those familiar with IFTT can think of CI as a more sophisticated version, with the ability to run scripts rather than predefined actions alone.
So what may we use this tool for? Commonly users may want to set up unit tests to run automatically on every push, and reject the push if any tests fail. You can even do things like have the server tweet out the commit description or send you an email on every merge.
A rather simpler example we’ll cover in this post involves the repository I use to post python workshops I give from time to time.
Example Action
All I’d like to do is, on every push, convert the .ipynb notebook file to a set of jupytext .html slides. The advantage of these slides being in an HTML format is that I can also use GitHub Pages to host these for free!
So before we get into the details of how we do this, let’s quickly go over the format of this solution. Ultimately, a .yml file will run which controls the commands that the CI server executes.
The .yml file will contain bash-like commands that will run sequentially.
Finally, a user can also use actions that others have developed. For instance, later on we’ll get into an action which sets up a pip environment from a specified requirements.txt file.
Now let’s breakdown the action for the workshop repo I mentioned.
The below code block is the GitHub Action which runs on the repo. It’s saved as main.yml in the hidden .github directory which exists in every GitHub repository.
Let’s go through this, line by line.
Steps
Setup Action
Firstly, we’ll give our GitHub Action a name: Build Slides.
name: Build Slides
Next, we specify when we want this action to run, in this instance I’d like it to run on every push to this repository.
on: [push]
The following option tells GitHub what operating system our remote server should be running, this isn’t too important in our case, but let’s say you were using an Action to test a piece of software to ensure it performs correctly. You may want to ensure it works on Linux, MacOS and Windows systems.
jobs:
  build:

    runs-on: ubuntu-latest
Now we’ve defined the basic setup, the following steps will run on this server.
Every step starts with a name, which is what’s shown to us whilst this runs, so it helps to be a bit descriptive.
Next, there’s the optional uses step.
If you’re using an Action developed by someone else then this is where you’d state what it is.
There can also be an optional with step where you’d state the arguments for this action. We’ll get into an example later.
Alternatively, other steps may require the run step instead.
This is where you’d put the actual commands you want the server to run, think of this as the commands that will run on a remote terminal, in this case on a Linux machine.
Checkout master branch
The first step uses the checkout Action, which performs git checkout on the master branch.
This enables the remote server to ‘see’ the master branch and act on changing it.
    steps:
    - name: Checkout master branch
      uses: actions/checkout@master
Setup python environment
Now we’ll setup a Python environment using the setup-python Action.
    - name: Set up Python 3.7
      uses: actions/setup-python@v1
      with:
        python-version: 3.7
Make slides
Now we have Python, I’ll explain the lines which occur in the run step:
- Let’s use pip to install a virtual environment using the
requirements.txtfile in the repo. - Then we’ll go into the
decorators-dataclasses-idesfolder, which is the place with the notebook file we wish to convert. - Then we use the
jupyter nbconvertcommand to convert the notebook to.htmlslides. This convertsdecorators-dataclasses-ides.ipynbtodecorators-dataclasses-ides.html - In order to have these
.htmlslides picked up by Github Pages it needs to be calledindex.html - So the last line changes the name to
index.htmlusing themvoption, the-foverwrites any existingindex.htmlwhich may exist.
    - name: Install dependencies
      run: |
        pip install -r requirements.txt
        cd decorators-dataclasses-ides/
        jupyter nbconvert decorators-dataclasses-ides.ipynb --to slides --SlidesExporter.reveal_scroll=True
        mv decorators-dataclasses-ides.slides.html index.html -f
Commit changes
So now we made the changes to the filesystem, let’s commit those changes.
This is what the Commit files step does.
It adds an email and user to the config file, then commits the changes.
If this commit results in no changes, then "No changes to commit" is printed to the console.
    - name: Commit files
      run: |
        git config --local user.email "action@github.com"
        git config --local user.name "GitHub Action"
        git status
        git commit -m "Add changes" -a || echo "No changes to commit"
Push changes
Finally, the last steps pushes these changes back to the repository.
This requires a secret token to prove the authenticity of the user who attempting the push, we state that in the with step.
   - name: Push changes
      uses: ad-m/github-push-action@master
      with:
        github_token: $
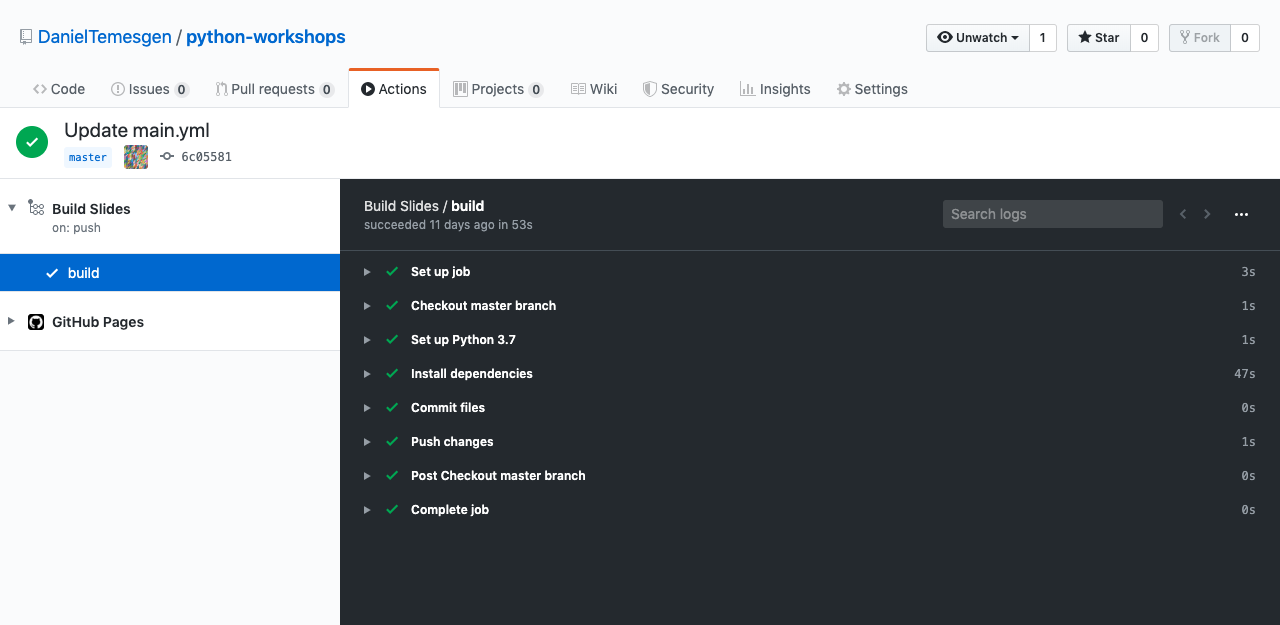
So now we’ve ran through the code let’s look at how this works.
User Interface
Here’s how it looks on the repo, each step runs sequentially, and it’s named according to the name we specified, we can expand further if we want to see the details of any particular step in the case of error.

And that’s it!
We’ve now gone through an example of a small GitHub Action which works. But we’ve only scratched the surface! For more examples of what’s possible visit the GitHub Actions page.